Weathershield: The Simple Installation Process
You’ve probably seen a bunch of cars around that have these extensions from their windows and on the hoods, and probably wondered what they are and what their purpose is. Are they purely for appeal, or do they have some sort of functionality? And the answer to the question is they’re weathershields, and yes – they both add appeal and functionality.
Before I installed weathershields to my vehicle I was aasking myself the same questions. And it wasn’t until my air-conditioning broke down and all I had to rely on for fresh, cool air were my window openings that I realized the importance of having a weathershield in order to get some air without ruining my neat hairstyle, and avoid rain-soaked door trims and foggy windows in the winter.
Simply put, a weathershield is an effective way to enjoy the outside air while keeping the dirt and dust out of your face, and ordering a burger and coke without getting wet in the rain. They’re available for almost any vehicle, and you can choose between slimline or full size models. Slimline models look less obtrusive and sleek, but are less effective. Furthermore, you can choose between dark tint or smoke tint.
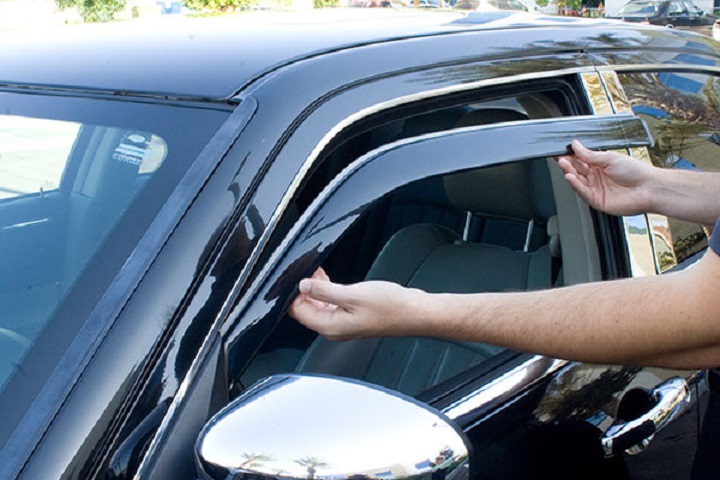
Perhaps the best part about weathershields is the fact that they’re very easy to fit. The installation process is basic, and you don’t need any special tools or modifications performed on your vehicle. First up, do some basic cleaning with warm soapy water. If it’s particularly dirty, an alcohol wipe will do the trick. Next, do a trial fit to ensure you have the right model for your vehicle.
Once you confirm it’s the right fit, break out the grease and wax remover and clean the area of grease and wax. Getting this part is important, so the weathershield sticks tightly and securely. And lastly, peel about 0.5cm of backing from the end of every adhesive strip and fold it back so you can remove it entirely when the shield is on the car.
After all is said and done, you should carefully line it up and stick it down on the corners. Once positioned correctly, grab the backing end you folded over previously and remove all of it. A firm press along the length of the adhesive strip will have your weathershield placed nice and firm. Congratulations, you’re done! The process really is that simple for most vehicles, especially if your doors don’t have full frames.